Alton Brown/Toll House Chocolate Chip Cookies

A photo of chocolate chip cookies stacked on top of each other next to a glass of milk

You really just can’t go wrong with any chocolate chip cookie recipe. Crispy, thin and crunchy, or thick and bready, I’ll take all comers. But that said, my favorite chocolate chip cookies are those that have a crispy exterior and are dense, rich, sweet and salty.

Continue reading “Alton Brown/Toll House Chocolate Chip Cookies”

Advertisement

Rosemary Mustard Pork Tenderloin

Pork is the unsung hero of the protein world. It’s inexpensive, delicious, and accessible. I’ve been following a low-carb diet for the past six months or so, and have utilized Carolyn Ketchum’s cookbook Easy Keto Dinners for the majority of my meals. They are easy to prepare and delicious, and even if you’re not doing the keto thing, but still want to cut some carbs, this cookbook is a great resource. The following recipe is adapted from her book.

Continue reading “Rosemary Mustard Pork Tenderloin”

Penouche? Gesundheit

dsc02238

My mom has been a candymaker for longer than I’ve been alive, learning the tricks and techniques from my grandmother. When I was young, she and my grandma Atkinson wrote a cookbook, Candymaking. It’s long been out of print, but it’s fun when I hear people who still refer to this cookbook on a regular basis. Growing up, I was surrounded with caramels, fudge, chocolates, and truffles. But my favorite was always a sweet treat called penouche.

The best way I can describe penouche is that it would be the love child of caramel and fudge. It has that thick, creamy texture of fudge, along with the sweet, caramel notes of a rich caramel.

For our neighbor gifts this year we decided to whip up some penouche, and I thought I’d share the recipe from my mom’s book.

Ingredients:

2 C whipping cream
1 T light corn syrup
2 C granulated sugar
1 C firmly packed brown sugar
3 T butter
1/2 C white compound coating or white chocolate chips
1.5 C pecans, toasted and chopped (if desired)

Line an 8-inch square baking pan with plastic wrap; set aside. In a heavy 4-quart saucepan, combine cream, corn syrup, and sugars. Place over medium high heat and stir with a wooden spoon until mixture comes to a boil. If sugar crystals are presents on the edges of the saucepan, wash down the sides with a wet pastry brush.

Clip on candy thermometer (if you don’t have a candy thermometer, use another highly accurate thermometer like a Thermapen (not sponsored–I just really like their stuff. But if you’re reading this, Thermapen, holla). Cook, stirring occasionally, to 236F (229F along the Wasatch Front due to our higher elevation/lower boiling point). Remove from heat. Without stirring, add butter. Let stand until thermometer cools to 210F. Without stirring, add compound coating. Let stand 1 minute. Remove thermometer. Add nuts and stir with a wooden spoon until white chocolate is melted and butter is fully incorporated. Candy should be thick and creamy. Scrape into prepared pan. Refrigerate 3 hours or until firm. Cut into 1 inch squares. Store in refrigerator. Makes 64 pieces.

While cooking, the penouche will stall right around the boiling point for several minutes while the water boils out. After that, it climbs quickly to 229F, so keep a close eye on it and don’t walk away. While stirring, stir gently to avoid having the sugar accumulate on the edge of the pan, otherwise the penouche will crystallize and lose its smooth, creamy texture.

dsc02207

dsc02217

dsc02219

dsc02220

dsc02221

dsc02234

Fig Balsamic Glazed Pork Chops with Polenta

I have a  love/love relationship with balsamic vinegar. I can’t get enough of it. Fruity, tangy, and sweet, it is a perfect accompaniment to numerous types of food. If you’ve only tried it with bread at your local Italian restaurant, I’d encourage you to give it a try on pork, chicken, and even ice cream.

Like wine, the taste and quality of balsamic vinegars depends on the source of the ingredients and the process used to transform them into a vinegar. Balsamic vinegar (aceto balsamico tradizionale) starts its life as white grapes, which are pressed and the resulting juice is reduced down to 30% of its original volume. This reduction, called the must, is then placed into wooden barrels and left to age for a minimum of 12 years and for as long as 25 years (!!!).

I stopped by the newly-opened We Olive Store and Wine Bar in Trolley Square. I will have a profile on them later, but the short story is that they specialize in selling California olive oils and balsamic vinegars. I brought home a bottle of one of my favorites that I tried at the store: the mission fig balsamic vinegar. This vinegar is less tangy and more sweet, thanks to the addition of the mission figs, and I figured it would go perfectly with some pork chops.

Fig Balsamic-Glazed Pork Chops with Polenta Cakes and Wilted Spinach

Ingredients

1 tube of precooked polenta (I get mine from Trader Joe’s)
4 tablespoons fig balsamic vinegar
Olive oil
1 tablespoon chopped rosemary
Kosher salt
Fresh ground black pepper
4 4-ounce portions of boneless center-cut pork chops, trimmed
1 10-ounce bag of spinach

Put the balsamic vinegar into a small saucepan, bring to a boil, and let it cook down about 1/3 of the original volume to concentrate the flavors (don’t go much more than that or you will have a syrup that’s too thick). Once cooked down, reserve the vinegar for later.

Place pork chops in a baking dish, cover each chop with olive oil, rosemary, some kosher salt, and black pepper. Turn the pork chops over and repeat.

Preheat a cast iron skillet and 2 tablespoons canola oil (or other high-temperature oil like grape seed) on medium-high heat. While it’s heating up, remove the polenta from the tube and cut them into 1/2 inch thick disks.

Place the polenta cakes into the skillet and cook until browned on both sides. Once cooked, put on a paper towel to remove excess oil from the cakes.

In the same skillet, place the pork chops and cooked to your desired temperature (I generally cook my pork chops to 135-140F). About a minute before they’re done, use a spoon or pastry brush to coat the pork chops with 1/2 of the reduced balsamic vinegar.

Pull the chops out a few degrees before they hit your desired temp (they’ll keep cooking due to residual heat). I highly suggest a quick read digital thermometer like the Thermapen to gauge meat doneness. No more overcooked proteins, and no more guess work.

While the pork is resting, dump the spinach in the same skillet and cook down to your desired doneness. Throw in some salt and pepper to taste.

Place a couple polenta cakes on your plate, top with a pork chop, and put the spinach on the side. Drizzle any remaining balsamic vinegar over the pork, and garnish with fresh rosemary.

Serves four.

SLCeats friends: as you know (and I hope appreciate), I do not have banner advertisements on my site. All of my projects, restaurant reviews, and other culinary adventures are self-funded. If you’d like to show some support by contributing a few bucks, I would truly appreciate it. Head over to Square Cash and make a contribution.

Sous Vide Carnitas

As you may have seen from my Instagram stories, I continue to learn how to cook with the Anova Sous Vide cooker. I was excited to receive the cooker as a Christmas gift, because I’ve been wanting one for a while. Through precise maintenance of the exact cooking temperature, sous vide enables a cook to cook meats (and veggies) at a precisely exact temperature. So, instead of cooking a ribeye on a blazing hot 500 degree flat top or grill and overcooking the outside of the steak in order to get the center up to 135 degrees, with sous vide you just set the water temp at 135, submerge the meat, and the entire steak cooks to a perfect 135. After a few hours, take it out, quickly finish it in a hot skillet to brown the outside, and you’re all set. Perfectly cooked meat, every time.

Learning, like any cooking technique, takes a bit of trial and error. But with help from one of my favorite websites, Serious Eats, I’m finally getting the hang of it.

This weekend’s experiment: sous vide carnitas. There are few foods I enjoy more in life than a taco filled with deliciously crisp, yet tender pork carnitas. The crispy bits add a contrasting texture to the unctuous meat that inches these guys towards near perfection.

For the pork recipe, I used the Serious Eats Sous Vide carnitas recipe. For those that don’t have a sous vide, they also have an oven-roasted recipe as well. If you want any leftovers, you will want to get the full four pounds the recipe calls for. I thought that was too much, and only bought two pounds from local butcher Beltex Meats, and we ended up with hardly any leftovers for two of us. There’s a lot of fat that renders out, and the pork cooks down.

Some other tweaks I made to our version: I did a quick-pickle of some carrots, which added some nice bright contrast to the rich pork. We also topped ours with avocado and some peppadew peppers from Beltex (you can also find them at Harmon’s). Next time I’ll grab some cotija and maybe some crema to throw on top as well.

carnitas-2

Argentinian Empanadas

Pork buns, pasties, kolaches, pirozhkis, bierocks, the list goes on and on. Every culture, it seems, has their own version of meat contained within bread, all contained in a neat hand-held, portable package.

They are cheap, portable, and filling. Perfect for people who are on the go. I spent a few years living in Buenos Aires, and Argentinean empanadas were my go-to for a quick, delicious meal. Savory meat is enveloped in a flaky, tender crust.

Below you will find my go-to recipe for empanadas. You can find the empanada shells (“tapas”) at any latin market. Make sure you take note when buying: there are tapas for frying and tapas for baking. Be sure to pick the corresponding type depending on how you’re going to cook them. I prefer baking.

Or you can save yourself the trouble and just head over to Argentina’s Best Empanadas in Salt Lake and buy them ready-to-eat.

Recipe

2 lbs hamburger (85/15)
2 large onions
5 tablespoons paprika
2 tablespoons salt
2 tablespoons onion powder
1 tablespoon sugar
2 tablespoons cumin
2 teaspoons white pepper (black works as well if you don’t have white)
3 tablespoons whole oregano
6 hard boiled eggs, chopped
1 cup green olives, chopped

Tapas (you will want around three to four dozen tapas). If they are frozen, put in fridge and allow to thaw.
Egg white

Cook onions over medium heat with some oil for three minutes, then add hamburger and brown the meat. Add paprika, salt, onion powder, sugar, cumin, pepper, and oregano. Cook until onions are translucent. Remove from heat and chill. Once chilled, add olives and chopped eggs.

Preheat oven to 400 degrees

Take a tapa and fill it with a couple spoonfuls of the meat filling. Fold the tapa in half over the meat filling, line up the edges and pinch closed with fingers. Take a fork, press down along the edges to form a strong seal between the two edges.

Place the filled empanadas on a baking sheet, and be sure they don’t touch. Either use parchment or a Silpat to prevent sticking. Brush each empanada with egg white. Bake for around 20 minutes or until brown.

These are great to eat fresh out of the oven, or throw them in the freezer to reheat for a quick snack later.


Light Wheat Bread

This recipe has been adapted from Luv To Cook’s wheat bread recipe. I’ve lightened it up a bit using some bleached flour to give it a bit better texture and lightness. Also, the Luv To Cook’s recipe calls for gluten, but I’ve found that as long as you use King Arthur flour, there’s no need for additional gluten as King Arthur is already very high gluten.

Also, one other recommendation: if you don’t have an instant read probe-style thermometer, I highly recommend you get one. It makes cooking much more enjoyable as it eliminates much of the guess work in cooking and baking. My favorite is the thermometer made by Thermapen. I’m not sponsored by Thermapen and I don’t have anything to do with them. I just think they’re the absolute best instant-read out there. And they’re local, which is a huge plus for me.

I have halved the recipe from the original simply because two loaves at a time is plenty for our little family. I will make two and wrap and freeze one.

Light Whole Wheat Bread

2.5 cups warm water (between 110 and 120 degrees)
2 tablespoon oil
1.5 tablespoon dough enhancer
2 tablespoon honey
2 teaspoon salt
1 tablespoon instant yeast
3 cups King Arthur whole wheat flour
3 cups King Arthur bleached bread flour

Mix yeast and warm water until bubbles start forming on the surface. Combine in large mixing bowl with oil, dough enhancer, honey, yeast, and 3 cups of the flour (doesn’t matter if it’s the whole wheat or bread flour). Mix on low speed in a Kitchenaid or a Bosch mixer for 1 minute. Add salt and remaining flour slowly until fully incorporated. Adjust the flour so that the dough is tacky, but not too sticky. Turn mixer to high and knead for another 8 minutes. 

Divide dough in two, then shape and place in greased bread pans. Let rise until the dough has doubled in size. 

Preheat oven to 350 degrees for at least 20 minutes prior to putting loaves in. Bake at 350 for 20-30 minutes or until the internal temperature of the bread is 190 degrees F. Then remove, let cool in pans for 5 minutes, then remove loaves and allow to fully cool on a cooling rack. 

Thyme Pork Loin with Plum Sauce

Adapted from my mama’s recipe

Years ago, my mom put together a recipe book containing my family’s favorite recipes. This is one of those recipes, slightly adapted.

What you’ll need:

1 pork loin (around 1 or 1.5 pounds)
¾ cup orange juice
3 tablespoons soy sauce
3 tablespoons Dijon mustard
2 tablespoons sugar
2 cloves garlic, crushed
½ teaspoon fresh ground black pepper
¼ cup chopped fresh thyme

Sauce:
3 tablespoons butter
½ cup orange juice 
2 tablespoons soy sauce
½ cup Amour italian plum marmalade 
1 tablespoon Dijon mustard

Place the pork in a large ziploc or non metallic pan. Combine the orange juice with soy sauce, mustard, sugar, garlic, pepper, and thyme. Pour over the pork loin. Refrigerate overnight, turning occasionally.

Drain meat and discard the marinade. Place the pork in a pan and cook at 325 degrees for about 30-40 minutes or until the internal temperature reads 145.

Meanwhile, heat the butter in a small saucepan until melted. Add the orange juice and soy sauce. Cook over medium low heat until sauce is slightly reduced. Stir in the marmalade and mustard, and continue to heat until reduced down a bit.

Let pork rest 5-10 minutes, then slice into thin slices. Top with the sauce, and garnish with fresh thyme. 

Cooking Class at ZY

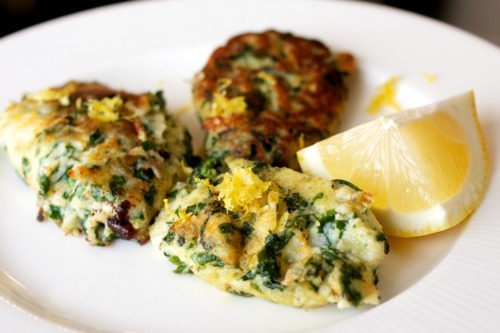
If you asked me to list my five favorite dishes in Salt Lake, ZY Restaurant’s scallops dish would certainly be on the list. Chef Matt said today that he strives to make dishes that diners regularly crave, and this dish fits the bill. Perfectly cooked scallops resting on a bed of almond romesco and drizzled with a red wine reduction and curry-infused oil. I haven’t forgotten this dish since I first had it last year.

Craving would be an apt description.

I was thrilled to hear that ZY was putting on a lunchtime class where Chef Matt would demonstrate how to make their signature dishes. Matt explained that there are only two dishes that have remained on the menu throughout their entire first year of being open: the scallops and tender pecan pork. When he first opened he had a lot of people ask him what his signature dishes are. He said he couldn’t answer that–the customers decide what the signature dishes are–and these two have remained extremely popular.

Attend a class that unlocks the secret to these dishes, and then be treated to lunch afterwards? Sign me up!

General Manager Miles Broadhead and Chef Matt Lake

I’ll share some tips that Chef Matt shared with us.

-Whenever possible, get “dry” scallops instead of “wet” scallops. Wet scallops have been treated with a chemical (sodium tripolyphosphate) to help them retain their moisture. Wet scallops are extremely difficult to sear due to the high water content–and a good sear is key with this dish. Talk to your local fish guy and ask them if they sell dry scallops. Chef Matt said that Whole Foods and Harmon’s does, but they might not be found in other grocery stores. Of course, Aquarius downtown would be an excellent source as well.

-Don’t overcook your scallops. They should be warmed throughout, but not overcooked. Put them in a very hot pan and by the time the scallops have a good sear on both sides, they’re ready to go.

-Whenever possible, use Kosher salt in your cooking. Sea salt is a great finishing salt, but doesn’t dissolve well, and iodized salt is, well, iodized salt. Matt uses Kosher mainly because it dissolves so well during the cooking process.

-Never, ever use bottled lemon juice. Lemons are cheap and plentiful, and fresh juice makes a huge difference in the overall taste of your dish.

-For the red wine reduction, use a red wine that you would drink (meaning not too crummy), but it doesn’t have to be top-shelf, either.

-You can make the red wine reduction ahead of time and then seal it in an airtight container and keep in the fridge. It can last up to a month if sealed properly and makes for a great finishing sauce.

-You can use a high-quality curry powder from the store, but Matt also likes to go to the Indian markets where you can make your own special curry powder blend. Don’t be afraid to experiment and play around with the ingredients.

-Chef Matt also shared a unique way to make infused oils. Fill a sterilized mason jar with oil, and then put whatever spices you want to infuse the oil with in with it (curry, rosemary, thyme, etc). Seal, and place outside in direct sunlight. On a hot day the sun will gently heat the oil to around 120 degrees and will begin to be infused with the spices. Once infused (taste to know when), filter the oil through cheesecloth and store the oil in a cool, dry place. It’s the fancy-pants take on sun tea.

Matt was a great instructor and even sent us home with the recipes! The scallops recipe is posted below, with permission.

Oh, also, Miles, the general manager, said that they plan to hold these classes quarterly, with the next class on December 1st. If you want to be put on their newsletter to be sure you don’t miss a class, call the restaurant at (801) 779-4730. You can also find ZY on Facebook and Twitter.

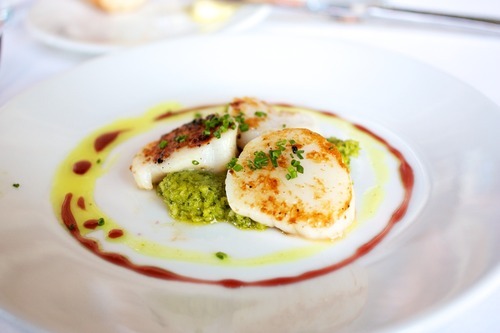
Scallops with Almond Romesco, Curry Oil, and Red Wine Reduction

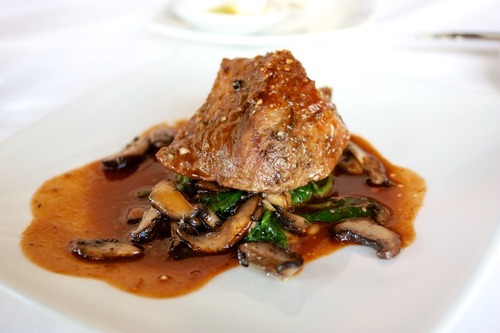
Tender Pecan Pork (I’ll be posting this recipe later)

ZY Scallops

Scallops with almond, curry, and red wine reduction.
Yield 4 portions

Scallops

12 ea. U12 dry sea scallops
Kosher salt
Fresh black pepper, ground

Almond Romesco

2 cups blanched, slivered almonds (don’t use roasted)
1 bunch flat leaf parsley
1 clove peeled garlic
Juice of one lemon
¾ cup extra virgin olive oil
Bread crumbs (approx 1 cup–don’t use panko)

In a food processor combine the nuts, garlic, and parsley. Blend till coarse ground and add the lemon juice. Slowly add in the olive oil and puree to a loose pesto consistency. Remove the mixture from the bowl and place in a clean mixing bowl. Slowly stir in the bread crumbs to lightly bind the mixture. Season with salt and set aside. May be made up to two days in advance and stored in the refrigerator. Bring up to room temperature before serving.

Red Wine Reduction

3 cups red wine of medium body
¼ cup raw sugar

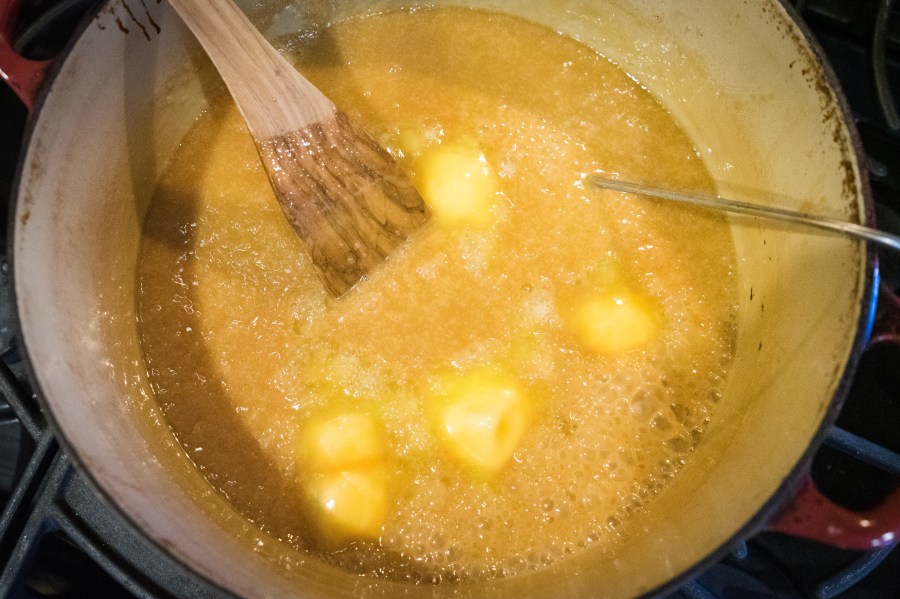
Place the wine and sugar in a small sauce pan. Reduce until light syrup consistency (when reduced about 2/3 of initial volume).

Curry Oil

1 tbsp yellow curry powder
2 cups grape seed oil

Combine the curry powder and oil in a small sauce pan. Heat on low heat until aroma from the curry develops (or use the “sun tea” method above)

To Assemble

Sear the scallops in a hot pan with a little oil until golden brown. Season with salt and pepper, flip, and repeat. When the scallops are just warmed through, remove from heat. Place the almond romesco in the middle of the plate, top with the scallops, drizzle a little of the curry oil and red wine reduction around the scallops. Serve.

ZY Restaurant on Urbanspoon

Ricotta Dumplings, The Copper Onion

Since it was our six-year wedding anniversary today, I decided to make a dish that’s special to us. One of our favorite dishes in Salt Lake is the lemon ricotta dumplings from The Copper Onion. Just about every dish at The Copper Onion gets rave reviews, but I think this dish is the all-star, and I’ve never heard anyone say they didn’t absolutely love it.

As I said in an earlier post, one of the things I admire in Ryan Lowder is that he’s not afraid to share the recipes to his most popular dishes with the public. I can’t remember where I found this recipe (let me know if you know who initially posted it), but I’m going to repost it with a few modifications.

If you haven’t tasted these dumplings before, you need to. They are a masterwork of opposites. They are dense and moist, yet still airy and light. They have some complex, deep flavors that are counterbalanced perfectly with the addition of bright lemon citrus.

I cut the recipe in half to make it a bit more manageable for our family of two, but I’m going to post his full recipe. Our half recipe made around 12-15 dumplings so the full recipe should produce around 30 dumplings.

Ricotta Dumplings
2 lbs ricotta
4 egg yolks
3 eggs
½ lb cheap parmigiano reggiano
1 lb spinach
1 ½ cups flour
.3 tsp ground nutmeg
Salt
Pepper

Garnish
Preserved lemon (I just used lemon zest)
Fresh thyme

Blanch the spinach and squeeze as much water as possible out of it. You want it as dry as possible (I placed the spinach between two dinner plates and smashed, smashed, smashed). Finely chop the spinach. Combine all ingredients except the flour and mix well. Add the flour in small amounts and mix until just blended. Then form the dough into dumplings (I formed mine into quenelles using two large spoons. You can see how to do it by watching this Youtube video).

At this point you should have water simmering in a large pot. I made the mistake of putting my dumplings into a rolling boil and it tore them apart. So a simmer is plenty. Make sure you don’t keep them in the boiling water for much longer than 15-25 seconds because they’ll begin to disintegrate.  Once you see the dumplings start to surface to the top take them out and immediately place them in a very hot sauté pan with browned butter. Caramelize on all sides, then plate and top with the lemon zest and thyme. I like to serve them with a lemon wedge to punch up the lemon flavor even more.

Try this out and let me know what you think!